

How to Clad Shower Walls Properly
- tim
- May 19
- 6 min read
A shower area usually shows up every weakness in a wall finish. Grout discolours, paint struggles with constant moisture, and small gaps around fittings can quickly turn into mould problems. If you are looking at how to clad shower walls, PVC wall cladding is one of the most practical ways to get a clean, waterproof surface without the upkeep that comes with tiles.
For installers, landlords and homeowners alike, the appeal is simple. You get a grout-free finish that is fast to fit, easy to wipe down and built to cope with wet conditions. Done properly, shower wall cladding gives you a durable surface that looks smart and keeps maintenance down long term.
Why shower wall cladding makes sense
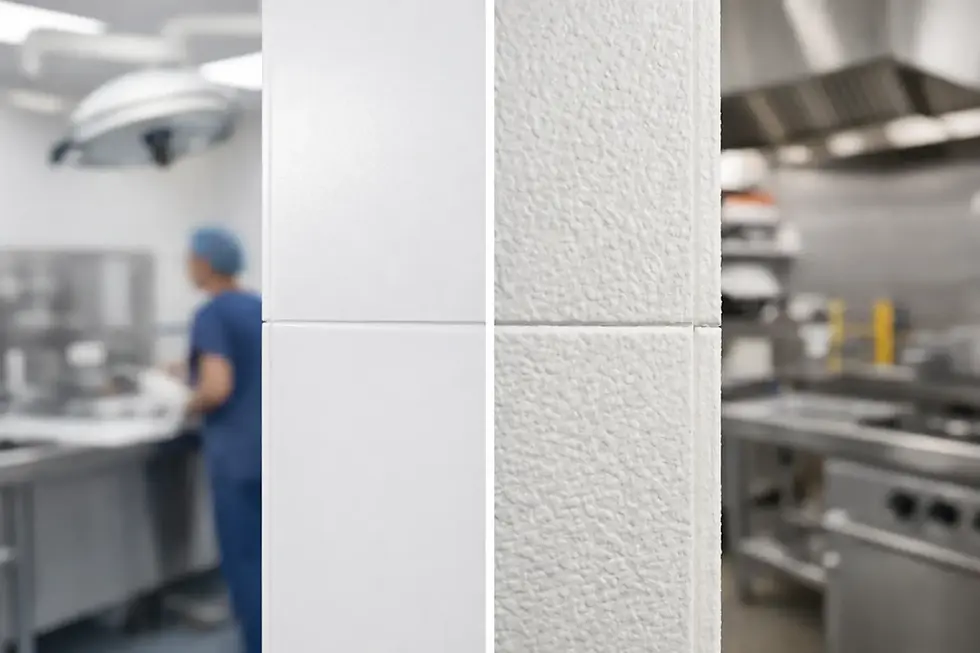
In a shower enclosure, water resistance is the first job, but it is not the only one. The wall surface also needs to stay hygienic, resist staining and keep its appearance over time. That is where PVC hygienic cladding has a clear advantage over many traditional finishes.
Because the sheets form a smooth, non-porous surface, there are fewer places for moisture, soap residue and bacteria to build up. There is no grout line to scrub and no porous joint that starts to deteriorate after repeated cleaning. For commercial washrooms, leisure settings, rental properties and busy family bathrooms, that can make a real difference to cleaning time and ongoing maintenance.
There is also the installation side to consider. Tiling can be labour-heavy, messy and slow, especially if the substrate is uneven or the room needs to be back in use quickly. Cladding sheets are often faster to install, particularly when used as part of a full system with matching trims, adhesives and sealants.
What you need before you start
Before you clad a shower wall, make sure you have the complete system rather than just the sheets. That usually means PVC cladding panels, the correct adhesive, colour-matched or compatible trims, sealant and basic fitting tools. A neat job depends as much on the finishing components as it does on the main panel itself.
You will also need a suitable substrate. Shower cladding should be fixed to a sound, clean and reasonably flat surface. Plasterboard, plywood, cement board and existing smooth wall surfaces can all work, but the wall must be stable. If the background is loose, damp or badly uneven, cladding over the top will only hide the problem for a short time.
If you are fitting around a shower tray or bath, check levels before you begin. Even a quality panel system can look poor if the starting line is off. A few minutes spent checking the base and wall alignment usually saves a lot of trimming and adjustment later.
How to clad shower walls step by step
The fitting process itself is straightforward, but shower areas do not forgive rushed work. Accuracy matters most at the joints, edges and penetrations.
1. Prepare the wall surface
Start by removing dust, grease, flaky paint and any loose material. If there are old tiles in place, they need to be firmly bonded and reasonably even if you plan to clad over them. Any damaged sections should be repaired first.
The wall needs to be dry before adhesive goes on. If there has already been a leak issue in the shower area, resolve that before installing any new finish. Cladding is waterproof on the face, but it should not be used to trap moisture behind the wall.
2. Measure carefully and plan the layout
Measure each wall section individually rather than assuming the enclosure is perfectly square. Many are not. Mark where trims will sit, where internal corners fall and where cut-outs are needed for valves, pipework or shower fittings.
This stage is where a lot of avoidable mistakes happen. If the first sheet starts out of line, every following sheet and trim will show it. Dry positioning the panels before adhesive is applied helps confirm the fit and keeps the installation moving smoothly.
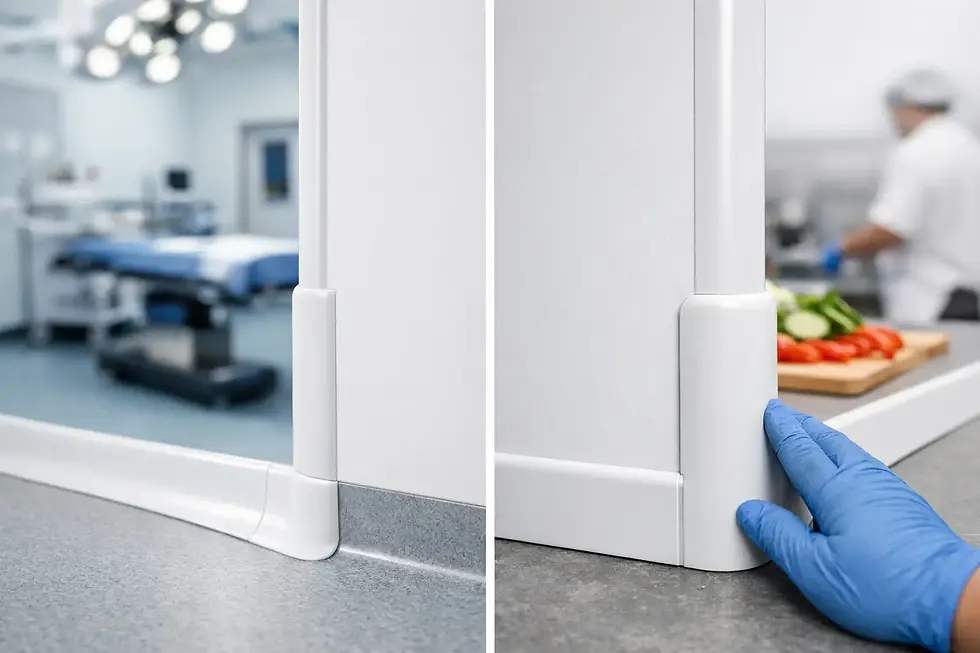
3. Fit trims first where needed
Internal corner trims, end caps and joining trims create the framework for a watertight finish. In most shower installations, these should be in place before the main panels are fixed. They help support alignment and create a cleaner edge detail than trying to finish everything with sealant alone.
Using a complete trim system also improves the final appearance. It gives the job a professional finish and reduces the risk of weak points at the edges, which is especially important in wet zones.
4. Apply adhesive correctly
Use the adhesive recommended for the panel system, applying it in the appropriate pattern across the back of the sheet or onto the wall, depending on the product instructions. Full and even support is important. You do not want hollow spots behind the panel in a shower area.
Press the panel firmly into place and check that it is seated properly. Some installers are tempted to over-apply adhesive, but too much can create uneven bedding and make positioning harder. Too little can affect long-term bond strength. This is one of those it depends moments where following the specific system guidance is better than relying on guesswork.
5. Cut accurately around fittings
Shower valves, mixer controls and pipe penetrations need clean, precise cut-outs. Measure twice and cut once. If a hole is oversized, you may still cover it with a flange plate, but you are relying on the fitting to hide the error.
A fine-tooth saw or suitable cutting tool helps keep the edges tidy. PVC cladding is generally easier to work with than tiles, but accuracy still matters if you want a smart finish.
6. Seal joints and edges properly
This is the part that really determines whether the installation performs well in a shower. Internal joints, perimeter edges and any areas around fittings should be sealed with a suitable sanitary or waterproof sealant where specified.
Do not treat sealant as a cosmetic extra. It is part of the water management in the enclosure. Pay close attention to the base where the panel meets the shower tray or bath, and to all internal corners. A clean, continuous bead is better than a rushed one that needs repairing soon after.
Best surfaces for cladding shower walls
If you are deciding what to clad over, the safest answer is always a solid, dry and even substrate. New plasterboard outside direct wet zones may be acceptable in some bathrooms, but in a shower enclosure many installers prefer a more moisture-resistant backing. Cement board or properly prepared solid walls often give more confidence in high-use settings.
Cladding over existing tiles can save time, and it is a common choice in refurbishments. The trade-off is that the tiled wall underneath still needs to be secure and fairly level. If tiles are loose or the wall is significantly uneven, removal and proper preparation will usually give a better result.
Common mistakes when cladding shower walls
Most failures come back to preparation, not the panel itself. Fixing onto a damp or unstable background is one of the biggest problems. The second is poor sealing at the tray, corners or cut-outs.
Another common issue is buying panels without the correct trims, adhesive and sealants. A shower wall system works best when the parts are designed to work together. Mixing products can be done, but it increases the chance of compatibility issues and can make installation less predictable.
There is also the question of finish. White and gloss options are popular because they keep the space bright and clean-looking, but some buyers prefer pastel or decorative finishes to soften the look. In compact bathrooms, lighter colours generally make the room feel bigger, while glossier surfaces can reflect more light but may show water marks slightly more readily between cleans.
Choosing the right cladding for a shower
Not all wall panels are suitable for every wet area, so check the specification rather than choosing on looks alone. For shower use, you want panels that are waterproof, easy to clean, resistant to mould and staining, and durable enough for regular exposure to cleaning products and moisture.
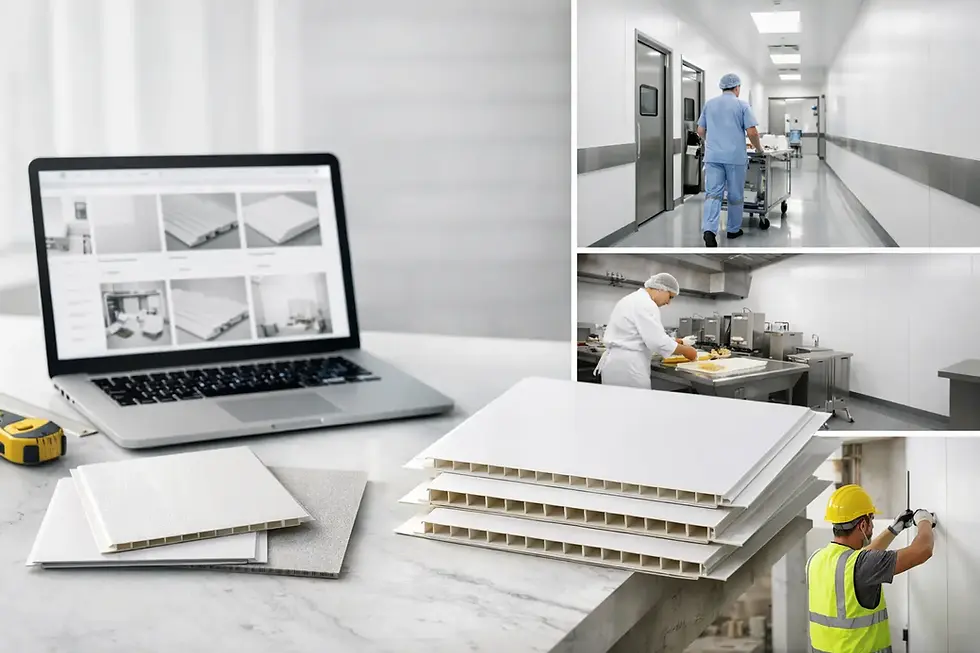
For many buyers, premium PVC hygienic sheets are the practical choice because they combine hygiene performance with a clean finish and straightforward installation. Features such as UV stability and Class 1 fire rating also matter, especially in project work where compliance and durability sit alongside appearance.
If you are ordering for a bathroom refurbishment or a commercial washroom fit-out, it makes sense to buy the full system in one go. That reduces delays, keeps the finish consistent and gives you everything needed to complete the job properly. Specialist suppliers such as Hygienic Sheets are set up for exactly that kind of project-led ordering, with panels, trims and fitting products available together.
Is cladding better than tiling in a shower?
For many applications, yes - but it depends on the priority. If you want decorative patterns, detailed layouts or a traditional tiled look, tiles still have their place. If you want speed, hygiene, low maintenance and a waterproof surface with no grout lines, cladding is often the stronger option.
That is why it is increasingly used not only in commercial washrooms and hygiene-sensitive spaces, but also in domestic bathrooms where people want less upkeep and a faster route to a smart finish. The best result comes from treating it as a proper system, not a shortcut.
If you are planning a shower refurbishment, focus on the finish that will still be working hard for you a year from now, not just the one that looks quickest on day one.
Comments