
Efficient bathroom cladding workflow for hygienic setups
- tim7892
- Mar 17
- 8 min read
Updated: Mar 20
Bathroom Cladding Workflow for Clean and Hygienic Environments
Bathroom cladding installations in commercial and healthcare facilities often fail due to improper workflows, creating hygiene risks and costly rework. Water ingress through poorly sealed joints, microbial growth behind panels, and delamination from incompatible adhesives undermine even the best materials. This guide provides contractors and facility managers with a proven workflow to achieve durable, hygienic PVC bathroom cladding installations that meet stringent hygiene standards whilst reducing project timelines and labour costs. You’ll learn preparation essentials, step-by-step execution, and maintenance protocols to ensure long-term performance in hygiene-sensitive environments.
Table of Contents
Understanding The Problem: Hygiene And Efficiency Challenges In Bathroom Cladding
Preparation Essentials For A Hygienic Bathroom Cladding Installation
Step-By-Step Execution Of Bathroom Cladding Installation
Maintaining And Verifying Hygiene Performance Post-Installation
Find High-Quality PVC Wall Cladding And Installation Supplies
Frequently Asked Questions
Key takeaways
Point | Details |
Surface preparation | Clean, dry, structurally sound substrates prevent delamination and ensure adhesive performance |
Installation speed | PVC cladding installs up to 5x faster than traditional tiling, reducing project timelines significantly |
Sealant selection | Proper sealants at joints prevent water ingress and microbial colonisation behind panels |
Maintenance routine | Regular cleaning with approved disinfectants maintains antimicrobial efficacy and extends service life |
Chemical resistance | PVC’s inherent resistance supports durability in environments requiring frequent chemical cleaning |
Understanding the problem: hygiene and efficiency challenges in bathroom cladding
Commercial and healthcare bathroom installations face unique pressures. High moisture levels, constant cleaning with harsh chemicals, and strict hygiene regulations create an environment where traditional materials struggle. Tiles, whilst familiar, present numerous failure points through grout lines that harbour bacteria and require extensive maintenance. Installation delays compound costs, and rework from water damage or hygiene failures disrupts facility operations.
Improperly sealed joints and edges can lead to water ingress and microbial growth, negating the benefits of the material. When contractors rush preparation or select incompatible adhesives, panels delaminate within months. Water penetrates behind cladding, creating ideal conditions for mould and bacteria. Healthcare facilities face particular risks, as compromised wall surfaces contribute to healthcare-associated infections.
Inefficient workflows magnify these problems. Contractors often underestimate preparation time, leading to rushed installations on unsuitable substrates. Lack of proper tools or incorrect panel cutting creates gaps that compromise the hygienic seal. Traditional tiling methods require extended drying times between stages, prolonging project duration and increasing labour costs. These delays disrupt facility operations and reduce contractor profitability.
PVC hygienic cladding addresses many material limitations, but only when installed correctly. The material offers waterproof, seamless surfaces with antimicrobial properties, yet poor installation technique undermines these advantages. Understanding uses for hygienic PVC wall cladding helps contractors recognise where proper workflow matters most. The following sections establish a systematic approach to eliminate common failures and maximise efficiency.
Key hygiene risks from poor installation include:
Water trapped behind panels creating microbial breeding grounds
Unsealed joints allowing moisture penetration and bacterial colonisation
Incompatible adhesives causing panel delamination and surface compromise
Inadequate substrate preparation leading to uneven surfaces and seal failures
Pro Tip: Document substrate conditions with photographs before starting work. This protects against disputes and helps identify potential problem areas requiring extra preparation.
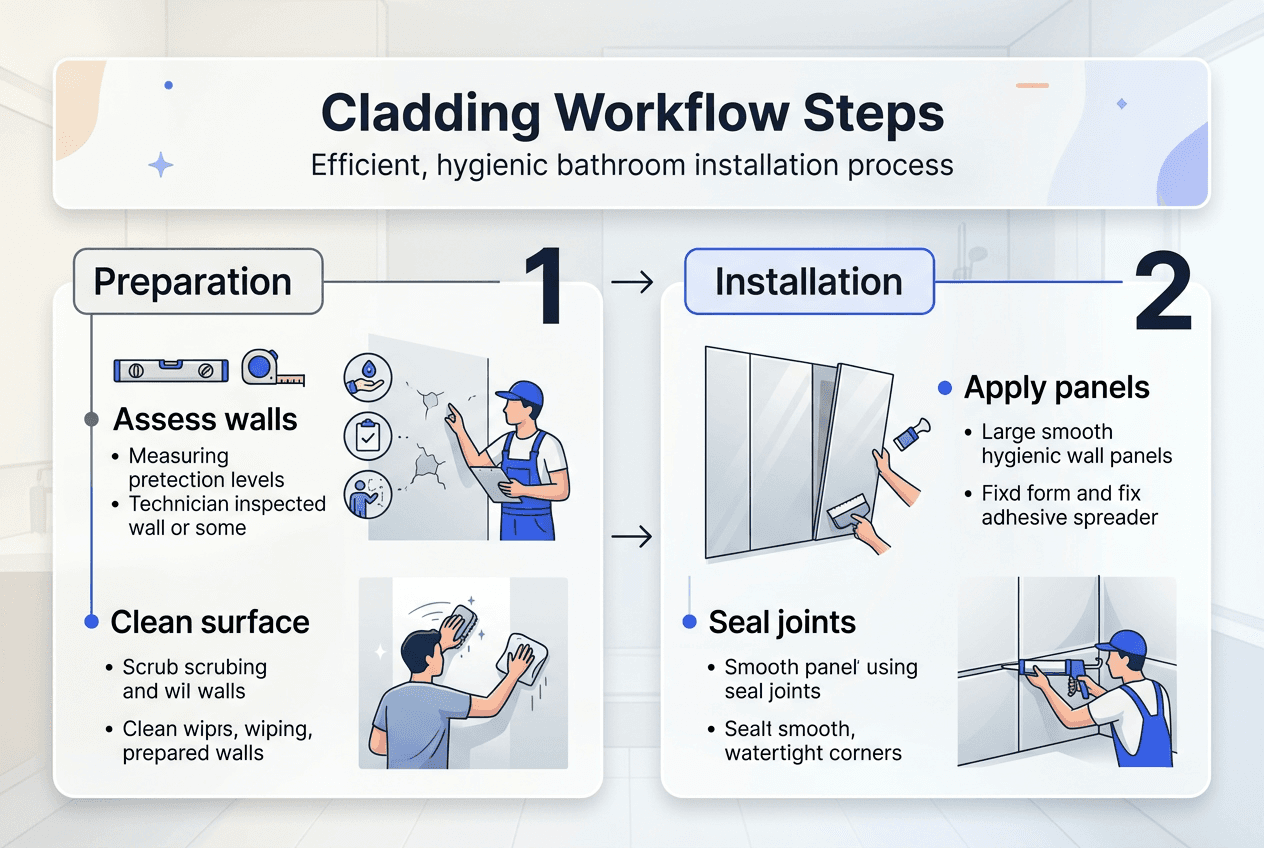
Preparation essentials for a hygienic bathroom cladding installation
Successful installation begins long before panels touch walls. Thorough preparation prevents 90% of installation failures and ensures hygienic performance throughout the cladding’s service life. Contractors who invest time in this phase complete projects faster with fewer callbacks and warranty claims.
Substrate assessment forms the foundation. Walls must be structurally sound, free from loose material, and capable of supporting panel weight plus adhesive. Check for dampness using a moisture metre, as wall cladding preparation requires dry surfaces for proper adhesive bonding. Remove any existing coatings, wallpaper, or contaminants that prevent adhesive contact. Fill cracks and holes with appropriate filler, then sand smooth to create an even surface.
Cleaning removes dust, grease, and biological contamination that compromise adhesive performance. Use a degreasing agent on surfaces previously exposed to oils or cleaning products. Rinse thoroughly and allow complete drying before proceeding. In healthcare settings, pre-clean with approved disinfectants to eliminate existing microbial populations.
Adhesive and sealant selection directly impacts long-term hygiene. The choice of adhesive and sealant is critical for ensuring the durability and hygiene of the cladding system. Select products specifically formulated for PVC cladding, as incompatible adhesives cause chemical reactions that weaken bonds. Check manufacturer specifications for substrate compatibility, open time, and curing requirements. Stock sufficient quantities to complete sections without interruption, as partial coverage creates weak points.
Priming improves adhesion on porous or problematic substrates. Apply primer to bare plaster, concrete block, or previously painted surfaces according to manufacturer instructions. Allow proper drying time before adhesive application. This step proves particularly important in older buildings where substrate composition varies.
Preparation Task | Time Required | Critical Success Factor |
Substrate assessment | 30-45 min per room | Moisture content below 12% |
Surface cleaning | 15-20 min per room | Complete removal of contaminants |
Filling and sanding | 45-60 min per room | Smooth, level surface |
Priming | 20-30 min per room | Even coverage, proper drying |
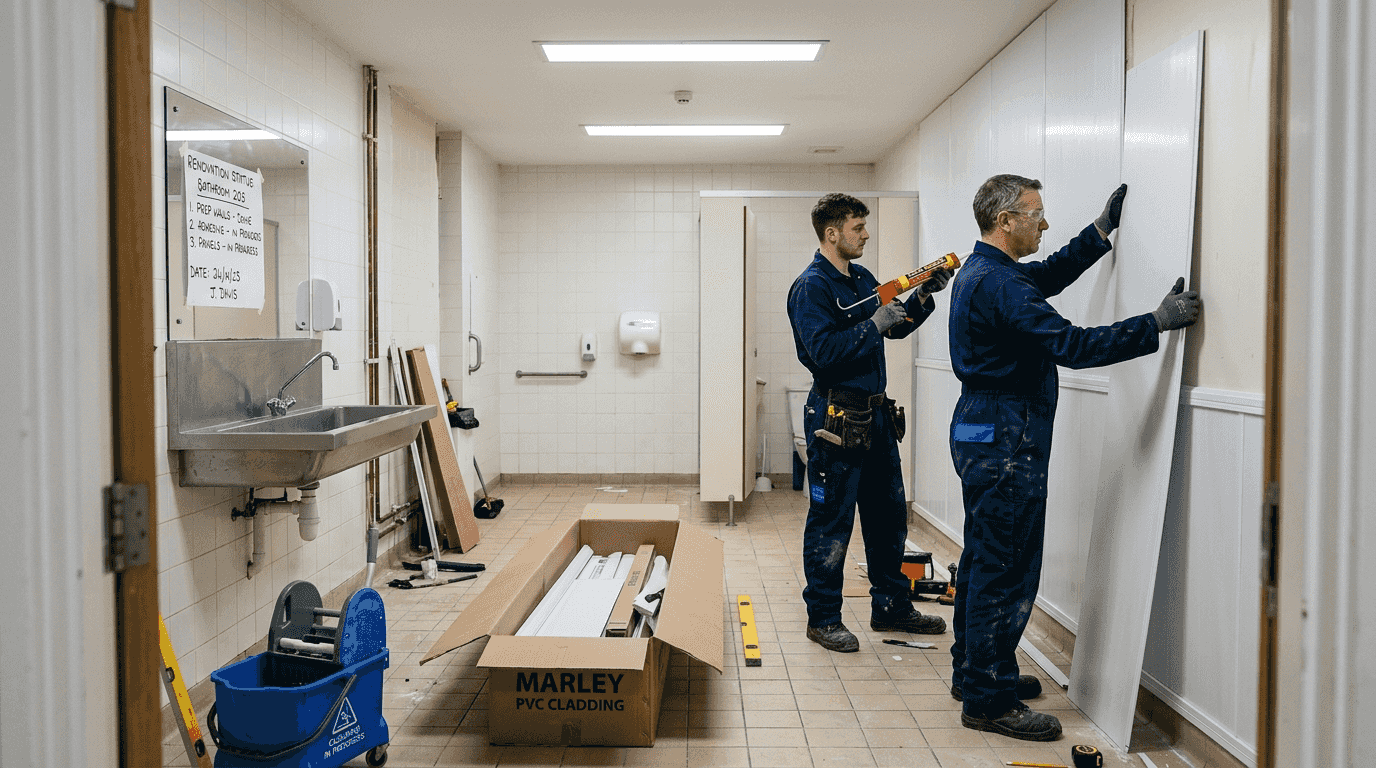
Gather all materials and tools before starting. You’ll need PVC panels, adhesive and accessories, trims, sealant, cutting tools, measuring equipment, and cleaning supplies. Pre-cut panels to size in a clean area, accounting for trim overlap and expansion gaps. Label each piece with its installation position to streamline workflow.
Pro Tip: Acclimatise panels to room temperature for 24 hours before installation. This prevents expansion or contraction after fixing, maintaining tight seals at joints.
Step-by-step execution of bathroom cladding installation
Systematic execution transforms preparation into a hygienic, professional finish. Following a logical sequence minimises errors and maximises efficiency, allowing contractors to complete installations in a fraction of the time required for traditional methods.
Start from the least visible corner, working towards the main entrance. This hides any minor adjustments in less prominent areas.
Apply adhesive to the substrate using a notched trowel, creating even ridges that ensure consistent coverage. Work in sections small enough to fix panels before adhesive skins over.
Position the first panel carefully, checking vertical alignment with a spirit level. Press firmly across the entire surface to achieve full contact with adhesive.
Install subsequent panels with tight butt joints, ensuring no gaps where moisture could penetrate. Wipe excess adhesive immediately with a damp cloth.
Fit corner trims and edge profiles as you progress, sealing joints with appropriate sealant. Smooth sealant with a wet finger or tool to create a concave profile that sheds water.
Cut openings for fixtures and fittings precisely, leaving minimal gaps that you’ll seal after panel installation.
Complete the installation by fitting top and bottom trims, ensuring water cannot run behind panels at these vulnerable points.
PVC hygienic cladding installation can be up to five times faster than traditional tiling methods, significantly reducing project timelines and labour costs. This speed advantage compounds in larger projects, where contractors complete multiple rooms in the time previously required for one. The efficiency stems from eliminating grouting, extended drying times, and complex cutting required for tiles.
Installation Aspect | PVC Cladding | Traditional Tiles |
Time per 100 sqm | 1-2 days | 5-7 days |
Labour cost | £800-1,200 | £3,000-4,500 |
Drying time | 24 hours | 72+ hours |
Maintenance access | Next day | 7+ days |
Detailed hygienic wall cladding installation steps ensure consistent quality across projects. Pay particular attention to wet areas around showers, baths, and sinks where water exposure is constant. Double-seal these zones with additional sealant behind trims and at panel edges.
Pro Tip: Install panels vertically in shower areas to minimise horizontal joints where water collects. This orientation reduces maintenance requirements and extends service life in high-splash zones.
Maintaining and verifying hygiene performance post-installation
Installation completion marks the beginning of the cladding’s service life, not the end of your responsibility. Proper maintenance preserves hygienic properties and prevents premature failure, protecting your reputation and reducing warranty claims. Facility managers require clear protocols to maintain compliance with health regulations.
Establish a cleaning schedule appropriate to the facility’s hygiene requirements. Healthcare environments typically require daily cleaning with hospital-grade disinfectants, whilst commercial bathrooms may need less frequent attention. Regular cleaning with appropriate disinfectants can maintain the antimicrobial efficacy of the surface. Use non-abrasive methods to avoid scratching the cladding surface, as damage creates harbourage points for bacteria.
Approved cleaning products include:
Quaternary ammonium compounds diluted per manufacturer instructions
Chlorine-based disinfectants at appropriate concentrations
Alcohol-based cleaners for routine maintenance
pH-neutral detergents for general cleaning
Avoid abrasive pads, scouring powders, or solvents that damage PVC surfaces. Test any new cleaning product on an inconspicuous area before widespread use. Rinse surfaces thoroughly after disinfection to prevent chemical residue accumulation.
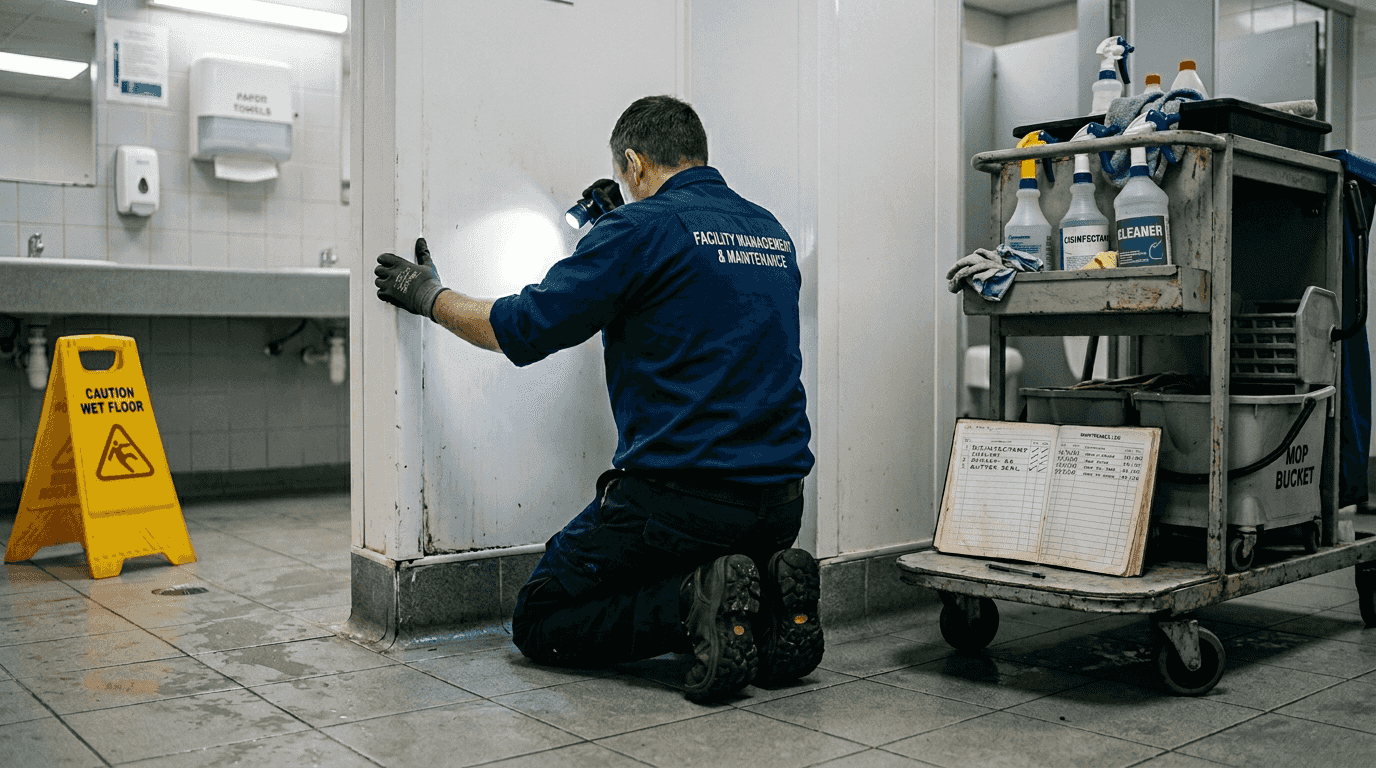
Regular inspections identify potential problems before they compromise hygiene. Check joints and seals monthly for signs of degradation, paying attention to high-traffic and high-moisture areas. Look for discolouration, gaps, or loosening that indicates water ingress. Address issues immediately with appropriate sealant or panel replacement.
Maintenance Metric | PVC Cladding | Tiled Surfaces |
Daily cleaning time (per 100 sqm) | 15-20 minutes | 45-60 minutes |
Annual deep clean requirement | 1-2 times | 4-6 times |
Disinfectant usage | 30% less | Standard |
Grout maintenance | None | Quarterly resealing |
Document all maintenance activities for compliance and quality assurance purposes. Record cleaning schedules, products used, and inspection findings. This documentation proves valuable during health inspections and helps identify patterns that might indicate installation or material issues.
Implement bathroom wall cladding maintenance steps as part of standard facility management procedures. Train cleaning staff on proper techniques and approved products to prevent damage from inappropriate methods. Consider creating a hygienic cladding maintenance checklist specific to your facility’s requirements.
Verify hygiene performance through periodic testing if required by regulations. Surface swab tests confirm cleanliness levels and identify areas needing additional attention. In healthcare settings, environmental monitoring programmes should include cladded surfaces to ensure they contribute to infection control rather than undermining it.
Find high-quality PVC wall cladding and installation supplies
Executing efficient, hygienic bathroom cladding installations requires reliable materials that meet stringent quality standards. Hygienic Sheets supplies contractors and facility managers with comprehensive PVC wall cladding systems designed for demanding commercial and healthcare environments across the UK.
Our product range includes panels in various colours and finishes, compatible adhesives and sealant accessories, and complete trim systems that ensure professional results. Each product undergoes rigorous testing to verify hygiene performance, durability, and ease of installation. ISO certifications guarantee consistent quality across orders, whilst technical support helps you select optimal solutions for specific project requirements.
Explore options like 2.5mm pastel willow wall cladding that combines aesthetic appeal with functional performance. Fast nationwide delivery ensures materials arrive when you need them, preventing project delays. Contact our team for expert advice on product selection, quantities, and installation techniques tailored to your project specifications.
Frequently asked questions
What are the main benefits of using PVC wall cladding in bathrooms?
PVC cladding provides waterproof, seamless surfaces that prevent water ingress and microbial growth, crucial for maintaining hygiene in commercial and healthcare bathrooms. The material installs significantly faster than traditional tiles, reducing labour costs and project timelines. Chemical resistance supports frequent cleaning with hospital-grade disinfectants without surface degradation. These benefits of PVC wall cladding make it ideal for facilities requiring stringent hygiene standards and minimal maintenance downtime.
How long does a typical PVC bathroom cladding installation take compared to tiling?
Generally, contractors complete PVC cladding installation in 1-2 days per 100 square metres, whilst traditional tiling requires 5-7 days for the same area. PVC hygienic cladding installation can be up to five times faster than traditional tiling methods, significantly reducing project timelines and labour costs. This efficiency stems from eliminating grouting, extended drying times between stages, and complex tile cutting. Facilities can return to normal operations much sooner, minimising disruption and lost productivity.
What maintenance is required to keep bathroom cladding hygienic over time?
Establish regular cleaning schedules using disinfectants approved for PVC surfaces, typically daily in healthcare settings and less frequently in commercial environments. Regular cleaning with appropriate disinfectants can maintain the antimicrobial efficacy of the surface. Inspect seals and joints monthly for degradation, addressing any gaps or damage immediately to prevent water ingress. Use non-abrasive cleaning methods to avoid scratching surfaces, as damage creates bacterial harbourage points. Follow the hygienic cladding maintenance checklist to ensure comprehensive care.
Which adhesives and sealants are best for hygienic PVC wall cladding?
Select adhesives and sealants specifically certified for PVC cladding applications, as incompatible products cause chemical reactions that weaken bonds and compromise hygiene. The choice of adhesive and sealant is critical for ensuring the durability and hygiene of the cladding system. Look for products with antimicrobial properties that prevent bacterial growth at joints and seams. Verify compatibility with your substrate type and check manufacturer specifications for open time, curing requirements, and chemical resistance. Quality adhesive and sealant accessories ensure long-term performance in demanding hygiene-sensitive environments.
Recommended
Comments