
Expert installation tips for hygienic wall panels in 2026
- Mick Brightmore
- 5 days ago
- 9 min read

Installing hygienic PVC wall panels in commercial and industrial settings demands precision, proper preparation, and strict adherence to hygiene standards. Poor installation leads to delamination, bacterial growth, voided warranties, and costly rework that disrupts operations. This guide provides contractors and facility managers with proven techniques for efficient, compliant installation across food preparation areas, healthcare facilities, and manufacturing environments. You’ll learn critical preparation steps, essential tools, systematic installation methods, and finishing techniques that ensure long-term performance and regulatory compliance.
Table of Contents
Key Takeaways
Point | Details |
Always prepare surfaces | Proper cleaning, drying, and substrate checks prevent future hygiene failures and delamination. |
Use correct trims and profiles | Choosing appropriate trims ensures a neat finish and full hygiene compliance. |
Seal and inspect joints | Thorough sealing and systematic inspections protect against moisture and bacterial risks. |
Follow a structured process | A consistent, step-by-step installation method reduces errors and rework. |
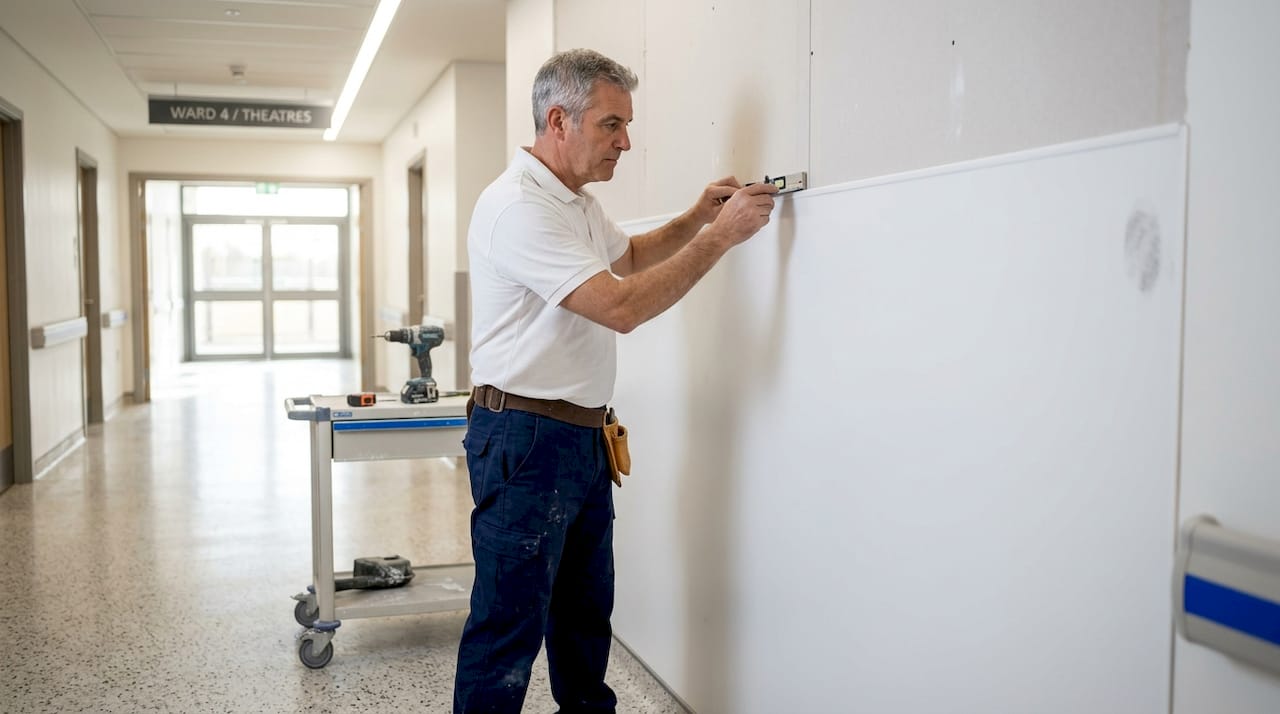
What makes hygienic wall panel installation unique?
Hygienic PVC wall panel installation differs fundamentally from standard decorative panelling. These installations must prevent microbial growth, withstand rigorous cleaning protocols, and meet stringent regulatory standards in sectors where contamination poses serious health and safety risks.
Errors during installation create immediate and long-term problems. Preparation is 50% of success; poor substrate leads to delamination, bacterial risks that compromise facility hygiene and require expensive remediation. Shortcuts in surface preparation, incorrect adhesive application, or inadequate sealing create voids where moisture accumulates and bacteria colonise.
The installation process requires specific steps not found in general panelling work:
Substrate flatness verification to ±3mm per metre
Moisture content testing below 14% threshold
Material acclimatisation for minimum 24 hours
Specialist trim profiles for watertight joints
Heat welding or advanced sealing in wet zones
Industries most impacted include food processing plants, commercial kitchens, hospitals, pharmaceutical manufacturing, and veterinary facilities. Each sector faces regular inspections where installation quality directly affects compliance outcomes.
“The difference between acceptable and excellent hygienic wall installation lies in the details most contractors overlook during preparation and finishing.”
Understanding why hygienic wall panels require specialised installation approaches helps you avoid the common pitfalls that lead to project delays and client dissatisfaction. The investment in proper technique pays dividends through reduced callbacks, faster inspections, and enhanced professional reputation. For comprehensive guidance, review best practices for installing hygienic wall panels before starting your next project.
Pre-installation checklist: Site and substrate preparation
Thorough site preparation determines installation success more than any other factor. Rushing this stage creates problems that surface weeks or months later, often requiring complete panel removal and reinstallation.
Critical surface criteria
Surface preparation is critical: walls must be clean, dry, free of contaminants, with moisture below 14%, flat to ±3mm/m, and acclimatised materials for 24+ hours. Each criterion serves a specific purpose. Flatness ensures consistent adhesive contact and prevents panel distortion. Moisture content above 14% causes adhesive failure and promotes mould growth behind panels. Contaminants like grease, dust, or chemical residues prevent proper bonding.
Material acclimatisation process
Store panels horizontally in the installation environment
Maintain room temperature between 15-25°C throughout acclimatisation
Allow minimum 24 hours for thermal stabilisation
Verify panels have reached ambient temperature before cutting
Keep panels wrapped until ready for installation to prevent surface contamination
Moisture testing procedures
Use a calibrated moisture meter at multiple points across each wall section. Test both surface and depth readings on porous substrates. Document all readings with photographs for compliance records. Common mistakes include testing only obvious problem areas, ignoring seasonal moisture variations, and proceeding with borderline readings that later cause failures.
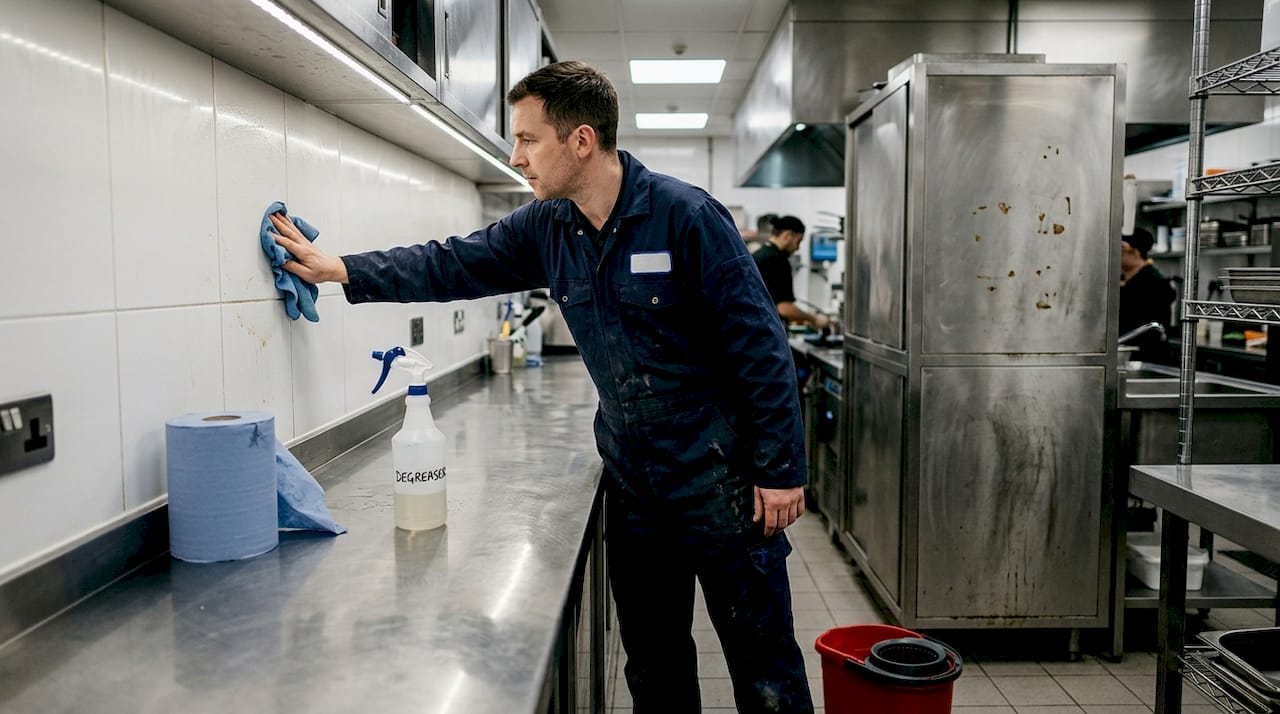
Cleaning and decontamination
Remove all loose material, grease, and existing coatings. Use appropriate degreasing agents in food preparation areas. Rinse thoroughly and allow complete drying before proceeding. In healthcare settings, follow facility-specific decontamination protocols before installation begins.
Pro Tip: Create a photographic record of every preparation stage, including moisture readings, surface condition, and cleaning completion. This documentation proves invaluable during inspections and protects against unfounded warranty claims.
Preparation stage | Acceptance criteria | Common failure point |
Surface flatness | ±3mm per metre | Ignoring minor undulations |
Moisture content | Below 14% | Testing too few locations |
Cleanliness | No visible contamination | Inadequate degreasing |
Acclimatisation | 24+ hours at site temperature | Installing cold panels |
For sector-specific requirements, consult detailed panel checks for hygiene spaces and follow the step-by-step installation guidance. Facility managers should reference the comprehensive wall cladding checklist when overseeing contractor work.
Essential tools and materials for quick, quality results
Assembling the correct tools and materials before starting prevents workflow interruptions and ensures consistent quality throughout the installation.
Must-have hand tools
Fine-tooth panel saw or jigsaw with PVC-specific blade
Precision measuring tape and square
Notched adhesive spreader matched to manufacturer specifications
Roller for applying even pressure during bonding
Sharp utility knife for trim work
Spirit level for vertical and horizontal alignment
Key materials selection
Choose PVC panels rated for your specific environment. Food preparation areas require panels with antimicrobial properties and smooth, non-porous surfaces. Healthcare facilities need panels meeting fire safety classifications. Select adhesive formulated specifically for PVC-to-substrate bonding in your temperature and humidity conditions.
Compatible accessories and profiles
Sealing and finishing: Use trims/profiles (starters, angles, joints), heat welding for seams in sanitary areas, silicone for joints; inspect for hygiene compliance. Starter trims create clean bottom edges and allow for expansion. Internal and external corner profiles provide watertight joints without exposed edges. Transition strips accommodate movement between different materials.
Adhesive compatibility matters enormously. Using general-purpose construction adhesive instead of PVC-specific formulations leads to bond failure. Select sealants that remain flexible, resist mould growth, and withstand repeated cleaning with harsh chemicals.
Pro Tip: For projects exceeding 50 square metres, stock duplicate cutting tools and spare adhesive spreaders. Tool failure mid-installation causes costly delays, especially when working to tight facility shutdown windows.
Quality hygienic wall panel trims transform installation efficiency and final appearance. Understanding trims and profile guide options helps you specify the right components for each joint type. Browse stylish waterproof profiles that combine functionality with aesthetic appeal.
Step-by-step process: Installation methods for best outcomes
Systematic installation methodology reduces errors and accelerates project completion whilst maintaining quality standards.
Plan panel layout and cutting strategy Measure wall dimensions and plan panel arrangement to minimise waste and avoid narrow strips at edges. Mark cutting lines clearly and verify measurements twice before cutting. Account for trim profile dimensions in your calculations.
Apply adhesive correctly Spread adhesive evenly using the notched spreader specified by the manufacturer. Maintain consistent coverage without gaps or excessive buildup. Work in sections small enough to complete before adhesive begins to skin over, typically 15-20 minutes in normal conditions.
Position and secure panels Align the first panel precisely using spirit level for both vertical and horizontal orientation. Press firmly across the entire surface, working from centre outward to eliminate air pockets. Use roller to apply even pressure and ensure complete adhesive contact.
Install trims and create joints Sealing and finishing: Use trims/profiles (starters, angles, joints), heat welding for seams in sanitary areas, silicone for joints; inspect for hygiene compliance. Fit starter trims before panels. Install corner profiles as you progress. Ensure all joints interlock properly without forcing, which can crack profiles.
Execute high-risk area sealing In wet zones and areas subject to direct water exposure, heat welding creates the most reliable seams. This technique fuses panel edges together, eliminating potential ingress points. Where heat welding isn’t practical, use high-grade silicone sealant applied in continuous beads without gaps.
Conduct installation inspection Check each completed section for proper adhesion by gently testing panel edges. Verify all joints are flush and properly sealed. Confirm trim profiles are secure and correctly aligned. Address any defects immediately whilst access and materials are readily available.
Proper installation technique reduces callbacks by 73% compared to rushed installations that skip verification steps. This efficiency gain translates directly to improved project profitability and client satisfaction.
For detailed visual guidance, reference the comprehensive installation guide with step-by-step photographs and troubleshooting advice.
Sealing, finishing and hygiene compliance: Avoid costly errors
Finishing work determines whether your installation passes inspection and performs reliably throughout its service life. Poor finishing creates hygiene vulnerabilities that undermine even perfectly installed panels.
Finishing method comparison
Method | Best application | Advantages | Limitations |
Trim profiles | General joints, corners | Clean appearance, allows expansion | Requires precise cutting |
Silicone sealing | Perimeter gaps, small joints | Flexible, waterproof | Degrades with harsh chemicals |
Heat welding | Wet zones, sanitary areas | Permanent fusion, no gaps | Requires specialist equipment |
Sealing and finishing: Use trims/profiles (starters, angles, joints), heat welding for seams in sanitary areas, silicone for joints; inspect for hygiene compliance. Each method suits specific situations. Combining techniques appropriately creates installations that withstand years of intensive use and cleaning.
Common compliance failures
Incomplete sealing at floor-wall junctions allowing moisture ingress
Gaps behind trim profiles creating bacterial harbourage points
Incompatible sealants that degrade under cleaning chemicals
Insufficient adhesive coverage causing panel movement
Exposed substrate at panel edges
Preparation is 50% of success; poor substrate leads to delamination, bacterial risks that inspectors identify immediately. Addressing these vulnerabilities during installation costs far less than remediation after inspection failure.
Inspector’s focus areas
Health and safety inspectors concentrate on:
Joint integrity in splash zones and areas subject to direct water contact
Seal quality around penetrations for pipes, electrical fixtures, and equipment
Panel security and absence of movement or hollow sounds indicating poor adhesion
Cleanability of all surfaces without crevices or gaps
Appropriate material selection for the specific hygiene classification
“Inspectors can spot rushed finishing work instantly. The difference between pass and fail often comes down to attention to detail in the final 10% of the job.”
Explore professional trimming options that simplify compliance. Learn how to select waterproof wall panels appropriate for your project’s hygiene classification. Understand the importance for facility managers when specifying installation standards.
Troubleshooting: Common mistakes to avoid with hygienic panels
Recognising and preventing typical installation errors saves time, materials, and professional reputation.
Top five installation mistakes
Taking preparation shortcuts: Skipping moisture testing or inadequate surface cleaning causes 60% of installation failures. Preparation is 50% of success; poor substrate leads to delamination, bacterial risks that appear weeks after handover.
Using wrong adhesive: General construction adhesives lack the flexibility and bond strength required for PVC panels. Temperature fluctuations cause differential expansion that breaks incompatible adhesive bonds.
Installing unacclimatised panels: Cold panels contract after installation, creating gaps at joints. Warm panels expand, causing buckling and distortion. Both scenarios require reinstallation.
Poor joint execution: Forcing trim profiles damages interlocking mechanisms. Inadequate sealant application leaves microscopic gaps where bacteria colonise. Misaligned joints create visible defects and cleaning difficulties.
Skipping final cleaning: Adhesive residue, dust, and installation debris left on panel surfaces create immediate hygiene concerns and poor first impressions during client handover.
Early issue identification
Check for hollow sounds when tapping panels, indicating insufficient adhesive coverage. Look for panel edges lifting or movement when pressed. Inspect all joints under angled lighting to reveal gaps invisible under direct illumination. Address problems immediately rather than hoping they won’t worsen.
Pro Tip: Conduct a comprehensive final walkthrough using a detailed checklist before client handover. Photograph completed installations from multiple angles. This documentation protects against unfounded complaints and provides evidence of quality workmanship.
Understanding how to choose the right wall cladding for each application prevents specification errors that cause installation complications.
Find premium panels and accessories for perfect results
Successful installation depends on sourcing quality materials from reliable suppliers who understand the specific demands of hygienic environments.
Access a comprehensive full wall cladding range featuring panels, trims, and profiles engineered for commercial and industrial hygiene applications. Every product meets rigorous quality standards with ISO certifications that satisfy regulatory requirements across healthcare, food preparation, and manufacturing sectors.
Benefit from technical support that helps you specify the right materials for your project’s unique requirements. Whether you’re fitting out a commercial kitchen, upgrading a healthcare facility, or installing panels in a pharmaceutical manufacturing environment, expert guidance ensures you select compatible components that install efficiently and perform reliably.
Fast nationwide delivery keeps your projects on schedule. Competitive trade pricing and bulk order discounts improve project profitability whilst maintaining the quality standards your reputation depends on. Browse specialist panel adhesives and accessories formulated specifically for hygienic PVC installations, ensuring compatibility and long-term performance.
Frequently asked questions
How do I ensure the wall is prepared for hygienic panels?
Ensure the substrate is clean, dry, free of contaminants, with moisture below 14%, flat to ±3mm/m, and acclimatised materials for 24+ hours before starting installation.
What profiles or trims should I use for the joints?
Use appropriate starter, angle, and transition trims for each joint, heat welding for seams in sanitary areas, and silicone sealant where welding isn’t practical.
How do I avoid bacterial risks with wall cladding?
Follow thorough preparation to prevent delamination and bacterial risks, ensuring all seams are properly sealed and finished for truly hygienic installations.
What is the best method to finish panel joints in wet areas?
Heat welding for seams in sanitary areas provides the most reliable waterproof seal, creating permanent fusion that eliminates potential bacterial harbourage points.
Recommended
Comments